
A legal argument works when I make the court’s job easy. In this article, I show that strong legal writing comes down to 10 simple moves: build one clear case theory, use a clean structure like IRAC/CRAC/CREAC, lead with the strongest point, line up facts with legal elements, write in plain English, use headings that make a point, explain every citation, keep tone steady, edit hard, and shape the argument for the forum.
If I had to boil the whole piece down, it would be this:
- Start with one clear theory
- Use a repeatable structure
- Match each fact to an element
- Put the best argument first
- Cut legalese
- Make headings do work
- Explain why each case, statute, or exhibit matters
- Stay measured
- Trim every weak sentence
- Write for the judge, jury, or adjuster in front of me
A big takeaway is that the article treats legal writing like a workflow, not just a writing task. That matters because judges often move fast, and studies on readability have long shown that shorter sentences and plain wording improve understanding. In practice, even a small change – like turning a label heading into an argument heading – can make a brief easier to scan.
Quick comparison
| Tip | Main job | What I focus on |
|---|---|---|
| 1. Clear theory | Set the core claim | Why my client should win |
| 2. IRAC / CRAC / CREAC | Organize each issue | Rule + facts + result |
| 3. Strongest first | Improve order | Best-supported point up front |
| 4. Facts + law | Link proof to elements | Liability, causation, damages |
| 5. Plain English | Cut clutter | Short, direct wording |
| 6. Headings | Guide the reader | Headings that argue, not label |
| 7. Evidence + authority | Support each point | Explain each citation in plain words |
| 8. Tone | Keep trust with the court | Calm, measured language |
| 9. Editing | Tighten impact | Delete anything that does not help |
| 10. Audience fit | Match the forum | Trial, appeal, or settlement |
My read: the article’s main strength is that it turns persuasion into a step-by-step process instead of vague advice. It does not just say “write better.” It shows how to do it: structure first, proof next, then editing and audience fit.
If I’m drafting a motion, trial brief, or demand letter, this gives me a simple checklist I can use right away.
What Makes a Legal Argument Persuasive
Persuasive legal writing moves the court toward a specific result by tying together the right facts, the right law, and clear reasoning. It does more than recap what happened or list legal rules. It presents the record through a clear theory of the case, shows how the facts meet the legal standard, and deals with likely objections before the other side can lean on them. Those parts need to work together.
A persuasive brief usually includes a few core pieces: a clear theory of the case, organized reasoning, controlling authority, a professional tone, and relevant evidence. If the citations are weak or the issues feel scattered, the argument starts to lose force. Clean, accurate drafting also matters. It signals credibility.
In personal injury cases, this often means connecting documented injuries, medical bills, and missed work to each element of negligence.
The tips below show how to use each building block.
1. Build a Clear Theory of the Case
A theory of the case is your one clear explanation of what happened, why the law is on your client’s side, and what you want the court to do. It’s the backbone of the brief.
Before you write anything, answer this: "My client should prevail because…" That answer becomes your working theory. It should spell out the legal claim, the key facts, the strongest evidence, the exact relief you want, and the other side’s best counterargument.
From there, the structure should follow the theory. Your introduction should boil it down to a few sentences. Your statement of facts should support it on purpose, not wander. And each argument heading should read like a short conclusion that pushes the same story forward. When the structure lines up with the theory, the brief reads like one unified argument. That theory then shapes the brief from start to finish.
In personal injury cases, this usually means tying duty and breach to medical proof, lost income, and pain and suffering, instead of just listing events in order. A strong case theory links the legal elements to the client’s actual losses.
Once the theory is set, use IRAC, CRAC, or CREAC to present it in a clean, organized way.
2. Use Argument Structures Like IRAC, CRAC, and CREAC
Now that the theory is set, use IRAC, CRAC, or CREAC to shape it into a clear, issue-by-issue argument. That theory should drive the structure of each argument block. These frameworks help keep liability, causation, and damages in view across the brief, and they give the court a sequence that’s easy to follow.
All three work from the same basic pattern: identify the issue or conclusion, state the governing rule, apply the facts, and restate the result. The main difference is the starting point. IRAC begins with the issue. CRAC and CREAC begin with the conclusion.
CREAC often fits personal injury briefs especially well because it gives the result up front, then walks through the rule and applies the facts to liability, causation, damages, or defenses. The added “E” for Explanation gives you room to synthesize the cases that shape the rule before you apply it. That’s handy when each issue stands on its own argument block.
The application section does the heavy lifting. This is where the argument becomes persuasive. Tie the rule straight to the facts. In a personal injury case, that can mean linking medical records, witness testimony, and timeline facts to each element of the claim.
Using each issue as its own CREAC block can also help you spot weak facts or missing authority early, before they turn into bigger problems during drafting.
| Drafting Step | What to Do |
|---|---|
| State the conclusion | Give the court the bottom line up front. |
| State the rule | Use the controlling statute, rule, or case standard. |
| Explain the rule | Briefly synthesize how courts have interpreted it. |
| Apply the facts | Tie each legal element to the specific facts of the case. |
| Restate the outcome | End the block with a concise, supported conclusion. |
3. Lead with Your Strongest Arguments
After you set the framework in CREAC, sort your arguments by strength. Put your most persuasive issue first, then build from there.
In many personal injury briefs, liability comes first because it gives causation and damages a clear starting point. When that piece is in place, the rest of the case is much easier to present in a convincing way.
Once you have the order, pick the proof that does the most work for each point. Rank arguments based on the quality of the record. Start with the issue backed by the clearest documents, testimony, and timeline facts. Then match each fact to the element it proves before you draft. That ranking should drive the order of your sections.
4. Organize Facts and Law for Maximum Clarity
After you choose the order of your arguments, set up the record so the court can move through each point without effort. At that stage, each fact and each authority should connect to a legal element.
Before drafting, use evidence mapping. Put each document, witness statement, and medical record next to the element it proves. In a personal injury case, that means linking the police report, medical records, or witness statements to duty, breach, or causation. This also helps you find gaps in the record before they turn into drafting problems.
State the causation chain early. If you lay out the sequence of events at the start of the argument section, the legal elements tend to fall into place. More importantly, the court stays tied to your theory throughout the brief.
When the timeline is tough to track, use a visual timeline. Digital reconstructions and chronological exhibits can clear up the factual sequence and help prove causation, injuries, or the order of events.
| Strategy | How It Works in Practice | Effect on the Argument |
|---|---|---|
| Evidence Mapping | Links each document or testimony to a specific legal element | Cuts redundancy and tracks proof efficiently |
| Early Causation Framing | Sets the sequence of events before the defense can | Keeps the court anchored to your theory |
| Visual Timelines | Uses chronological exhibits or digital reconstructions | Clarifies complex facts without losing sequence |
| Damage Modeling | Organizes medical projections and wage loss into a clear damages sequence | Makes the damages theory easier to follow |
State each fact-to-element link in one clear sentence, then cut the boilerplate.
Once the facts and law are in order, the next move is to strip away unnecessary legal language.
5. Write in Plain English and Cut Legalese
Plain English makes your argument easier to follow. It also helps you lay out your theory early, before the other side gets a chance to reframe the facts.
Clear wording does something else too: it makes medical facts easier to tie to liability, causation, and damages. If a diagnosis, prognosis, or day-to-day limit is explained in simple, direct terms, the causation link is easier to see. And the damages picture becomes much easier for the court to grasp.
In day-to-day drafting, use the simplest accurate word. Cut any phrase that doesn’t add precision. Then, once the wording is clean, use headings and topic sentences to guide the court through the argument.
sbb-itb-68ed374
6. Use Headings and Topic Sentences Deliberately
Once your wording is plain, headings and topic sentences show the court where to look. A well-placed heading sets the frame before the judge reads a single line of argument. Then a strong topic sentence backs up that frame right away.
In personal injury briefs, that early framing matters a lot. Headings can set up liability at the start by tying the issue to duty, breach, and causation. That gives the court a clear path into the argument instead of making it piece things together on its own.
Topic sentences matter just as much inside each paragraph. Each one should tie the paragraph to a single legal element. That kind of signposting keeps the argument tight and helps the court follow the structure without losing the thread.
Treat every heading like a short argument, not a label. A heading should say the point it proves. For example, "Medical Records Support Causation" is stronger than "Medical Evidence." That small shift makes the brief easier to scan. It also makes it easier to place authority next to the point it supports.
7. Present Evidence and Legal Authorities Effectively
Once your structure and signposting are in place, the next job is simple: make each citation and exhibit matter right away. Evidence and legal authority shouldn’t just sit in the brief. Each one should prove a specific point. In personal injury cases, that matters a lot because liability depends on proof tied to the record.
In a personal injury brief, every exhibit should do a clear job, not just take up room. A medical record, for example, shouldn’t appear only as "Exhibit A." Set it up in plain English: "The emergency room report from the date of the incident documents the injury and helps connect it to the claim." That one sentence tells the court why the document matters before it reads anything else.
Legal authorities need the same kind of setup. Cite a statute, rule, or case to answer a question the court is already dealing with, not to show off your research. Name the governing statute with precision, explain the rule in plain English, and then show how the facts meet it.
Use the chart below to match each type of authority or evidence to its role in the argument.
| Legal Authority / Evidence Type | How to Use It in a Brief | What It Adds |
|---|---|---|
| State statutes | State the threshold | Establishes the legal baseline for the claim |
| Evidence Code | Meet procedural rules | Helps prevent exclusion of supporting facts |
| Expert testimony | Explain technical points with expert reports or testimony | Increases credibility and clarifies complex issues |
| Admissions of fact | Lock in undisputed facts | Removes factual disputes and streamlines the argument |
| Medical records | Tie to an element such as causation, severity, or duration | Grounds the narrative in documented proof |
A good drafting habit is this: after any citation to an authority or exhibit, add one sentence that explains why it matters in plain English. If you can’t explain the citation in one plain sentence, cut it or build it out more.
Once the proof is in place, the next challenge is presenting it without sounding defensive or overstated.
8. Keep a Professional Tone Throughout
Once the facts and the law are in place, tone shapes how the argument lands. If a brief sounds irritated, dismissive, or exaggerated, it can lose credibility fast. Legal accuracy matters, and so does the way the writing comes across.
In personal injury cases, the facts can be hard to read and the stakes can be high. That emotional pressure can slip into the writing if you let it. The better move is simple: let the facts do the work and cut loaded language. That restraint should show up in every part of the brief.
The same rule applies across every filing. Use the same steady tone in the complaint, motion practice, and supporting papers. The complaint sets the base for the case, and a weak draft can put the whole plan at risk. When the tone stays consistent, your writing sounds more credible.
9. Edit for Concision and Impact
Once the argument is set, editing decides whether the court can follow it fast. A brief packed with extra words can bury your best points. Tight writing shows precision and discipline.
After you map the record to the elements, cut any sentence that doesn’t move the point forward. A simple rule works well here: tie each sentence to a legal element or delete it. The same goes for each paragraph. Keep only what helps prove an element.
If the record is dense, visuals can do work that long factual explanation can’t. Swap long descriptions for a timeline or chart that shows the sequence at a glance.
Use experts to turn future costs into plain, specific figures. Turn complex damages into simple, specific numbers. Concise drafting also makes the final audience-specific revisions easier.
10. Tailor the Argument to the Court, Audience, and Relief Requested
Different forums reward different arguments. A trial court usually wants a clear factual story. An appellate court wants legal error. Settlement talks are about leverage. Once your argument is set, shape it for the forum that will decide it.
At the trial level, the argument often leans on a jury-friendly story that organizes the record in a way people can follow. But when you’re speaking to the judge, the focus shifts. Procedure matters more. Legal standards need to be stated cleanly and tied to the record. On appeal, that shift gets even sharper. There, error matters more than story.
Appellate briefs should focus on reversible legal error, not a new spin on the facts.
Settlement arguments work by a different playbook. The audience is often an insurance adjuster or opposing counsel, and the goal is to show you’re ready for trial and to build settlement leverage. That means some material that may not come in at trial, like a police report, can still help during negotiations.
Use the chart below to match the forum, the audience, and the proof you lean on.
| Argument Context | Primary Audience | Key Strategy | Evidence Usage |
|---|---|---|---|
| Trial Court | Jury & Judge | Narrative storytelling & causation | Uses only admissible evidence |
| Appellate Court | Appellate Judges | Legal errors & procedural grounds | Restricted to the trial record |
| Settlement | Insurance Adjusters | Settlement leverage & preparedness for trial | Can include leverage materials even if inadmissible at trial |
In personal injury cases, this kind of tailoring also means dealing with jurisdiction-specific thresholds. If the law sets a threshold, say it in plain English and connect the facts to it. From the first sentence, write for the person making the call and the relief you want.
Tables to Support Key Tips
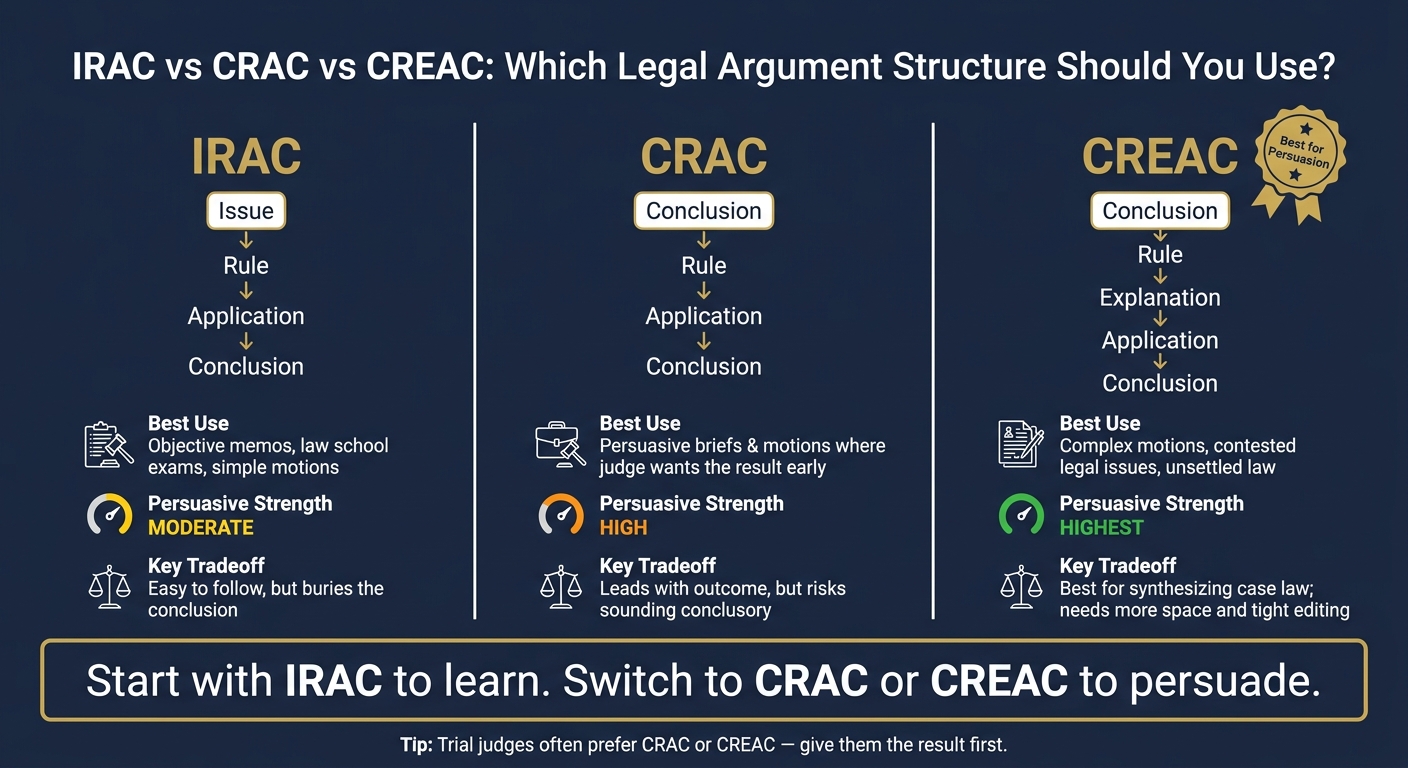
IRAC vs CRAC vs CREAC: Legal Argument Structures Compared
Use these tables to draft faster and trim weak phrasing.
Tip 2 – Choosing Between IRAC, CRAC, and CREAC
Before you draft a major argument section, use this table to choose the right structure. If you’re writing for a trial judge who wants the bottom line up front, CRAC or CREAC will usually serve you better than IRAC.
| Structure | Full Sequence | Best Use | Persuasive Strength | Key Tradeoff |
|---|---|---|---|---|
| IRAC | Issue → Rule → Application → Conclusion | Objective memoranda, law school exams, and simple motions where the law is clear | Moderate | Easy to learn and follow, but it can bury the conclusion and read as more descriptive than persuasive |
| CRAC | Conclusion → Rule → Application → Conclusion | Persuasive briefs and motions where the judge wants the requested result early | High | Leads with the outcome, but it takes careful drafting so it doesn’t sound conclusory |
| CREAC | Conclusion → Rule → Explanation → Application → Conclusion | Persuasive briefs, complex motions, and unsettled or contested legal issues | Highest | Best when you need to synthesize case law; it takes more space and tighter editing |
Tip 6 – Revising Weak Headings Into Strong Ones
After drafting, review every heading in your brief. If a heading just names a topic, it needs work. A strong heading tells the court what ruling you want and why.
After structure comes signposting.
| Weak Heading | Strong Revision | Rule Applied |
|---|---|---|
| "Standard of Review" | "The Court Should Deny Summary Judgment Because the Record Contains Genuine Disputes of Material Fact" | Add the desired outcome + legal basis |
| "Negligence" | "Defendant Is Liable Because It Breached Its Duty to Maintain Safe Premises" | Replace topic label with a party-specific argument |
| "Evidence" | "Photographs and the Accident Report Show the Hazardous Condition Existed Before the Fall" | Link evidence directly to a legal proposition |
| "Damages" | "Plaintiff Is Entitled to Full Compensation for Medical Expenses, Lost Wages, and Pain and Suffering Under the governing law" | Name the relief requested and the governing law |
Tip 7 – Mapping Evidence to What It Proves
Once your headings are in place, map each exhibit to the element it proves. This keeps your argument tight and helps you avoid dumping evidence onto the page without a clear point.
| Evidence Type | Liability | Causation | Damages | Practical Note |
|---|---|---|---|---|
| Medical records | Secondary | Primary | Primary | Document diagnosis, treatment timeline, and prognosis; link injuries to the date of the incident |
| Expert reports | Secondary | Primary | Primary | Medical experts connect crash forces to injuries; economists calculate lost future earnings in dollars |
| Photographs / videos | Primary | Secondary | Secondary | Show scene conditions, hazard visibility, vehicle damage, and visible injuries |
| Accident / police reports | Primary | Secondary | – | Record officer observations, party statements, citations, and sequence of events |
| Billing summaries / itemized bills | – | Secondary | Primary | Quantify economic loss; itemized statements carry more weight than summary totals |
Lead with the evidence that matches the disputed element. Use photos and reports for liability, medical records and expert opinions for causation, and itemized bills and wage records for damages.
Conclusion
Persuasive legal writing works when the path is clear. You need a strong case theory, a disciplined structure, plain language, deliberate headings, well-mapped evidence, and tight editing. Put those pieces together, and legal analysis becomes a brief a court can follow fast.
These techniques help with motions, trial prep, and appeals because they narrow the issues, organize the evidence, and frame the result you’re asking for. In appellate advocacy, the job shifts to showing reversible error, so precision and record-based analysis matter most. These 10 tips give you a practical workflow from theory to final edit.
FAQs
When should I use IRAC, CRAC, or CREAC?
Use IRAC, CRAC, and CREAC when you need to turn case facts and evidence into a clear, persuasive legal argument for a judge or jury.
IRAC stands for Issue, Rule, Application, and Conclusion. CRAC and CREAC add more structure, which can help you deal with counterarguments or explain tougher legal standards with more clarity.
How do I turn facts into stronger legal arguments?
Start with a clear factual base built on accurate records, such as medical files, police reports, and witness statements. Then tie those facts directly to the legal elements of the case: duty, breach, causation, and damages.
Use medical experts to explain complex issues, and back up each claim with concrete evidence tied to specific exhibits. Keep the language active, professional, and precise.
What makes a legal brief easier for a judge to follow?
Focus on clarity, organization, and simple wording. Present the facts with care, keep a respectful, professional tone, and use plain language when explaining legal or technical points.
It also helps to lay out the timeline in clear chronological order and organize the evidence in a logical way. When the facts connect directly to the law through a clear narrative, the brief becomes easier for a judge to follow.