
If I want my injury claim to hold up, I need one thing right away: every record in one clear system. Missed records, mixed-up dates, and loose receipts can make it easier for an insurer to question treatment, costs, or whether the injury came from the accident at all.
Here’s the short version:
- I gather all injury-related records from every provider
- I keep medical records, itemized bills, EOBs, receipts, and mileage logs
- I sort everything by provider, document type, and date
- I use MM/DD/YYYY in logs and timelines
- I save digital files with names like
YYYY-MM-DD – Provider – Document Type - I update my file within 24–48 hours after each visit
- I track missing records with a simple request list
A few facts matter here. Under HIPAA, providers generally have 30 calendar days to respond to a records request. And if I drive to treatment often, mileage, parking, tolls, and pharmacy costs can add up to hundreds or even thousands of dollars over the life of a case.
My goal is simple: show what happened, when I got care, how treatment moved forward, and what it cost in clear date order.
A simple setup looks like this:
| Part of the file | What I keep |
|---|---|
| Medical care | ER notes, hospital records, office notes, therapy notes, imaging, labs |
| Costs | Itemized bills, EOBs, pharmacy receipts, supply receipts |
| Travel | Appointment dates, destination, purpose, round-trip mileage, parking, tolls |
| Case tracking | Treatment timeline, missing-record list, latest updates |
I don’t need a fancy system. I just need one I will use every time.
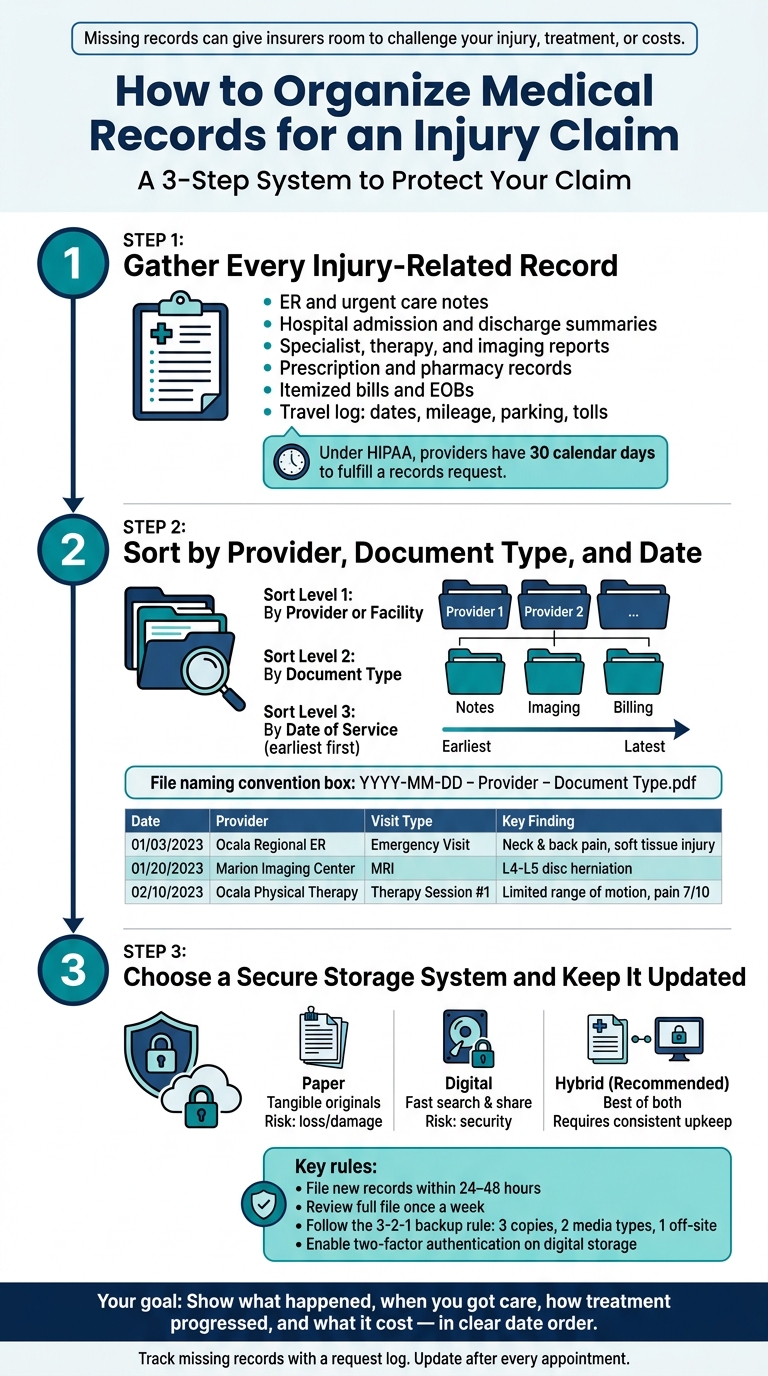
How to Organize Medical Records for an Injury Claim: 3-Step System
Step 1: Gather every injury-related record in one place
Start by pulling every injury-related record into one place. That means medical records, itemized bills, and expense receipts. If even one provider is missing, that gap can give an insurer room to question your claim.
Gather:
- ER and urgent care notes
- Hospital admission and discharge summaries
- Primary care, specialist, and physical therapy notes
- Imaging and lab reports
- Prescription records
- Work restriction or disability forms
These records show the injury itself, the care you received, and how recovery unfolded. Once you have them together, sort everything by provider, document type, and date.
How to request records from each provider and facility
Next, make a master list of every provider and facility involved in your care. Include the ER, hospitals, primary care doctors, specialists, imaging centers, labs, physical therapy clinics, and pharmacies. For each one, write down the name, address, phone number, and patient portal.
Many providers now let you pull visit summaries, test results, and billing records straight from a patient portal. That’s the easy route. If there’s no portal, call the medical records department and ask how they handle requests.
Send a written request with your full name, date of birth, service dates, and a clear note about which records you want. Ask for complete records, not just summaries. That includes referrals, imaging reports, and test results. Under HIPAA, providers generally have 30 calendar days to fulfill your request.
It also helps to compare your provider list with your insurance EOBs. EOBs show every provider that billed your health insurance. So if a radiology group or independent lab shows up there but not on your list, add it and request those records too.
Include billing, mileage, and expense documents
Medical records tell part of the story. They don’t show the full cost of the injury.
Request itemized bills from every provider. Those bills break out each service, the date, and the charge. Then match them with your EOBs so you can show what insurance paid and what came out of your own pocket.
You should also keep:
- Pharmacy receipts
- Supply invoices for braces, crutches, or wound care
- A travel log for every appointment
For each trip, record the date (MM/DD/YYYY), destination, purpose, and round-trip mileage. Add any parking fees, tolls, or rideshare costs too. Bit by bit, these records show the full financial weight of recovery. They also set up the timeline you’ll build in the next step.
sbb-itb-68ed374
Step 2: Sort records by provider, document type, and date
Once every record is in one place, the next move is simple: put it in order.
The easiest setup is a three-level structure:
- Sort first by provider or facility
- Then by document type within that provider
- Then by date of service within that document type
That layout lines up with how claim reviewers read records: one provider at a time, in date order.
Use clear folder labels and consistent file names
For paper files, use one main binder or accordion folder labeled with your case name. Inside, give each provider its own tabbed section. For example, "Ocala Regional Medical Center – ER/Hospital", "Dr. Jane Doe – Primary Care", "Marion Imaging Center", and "Ocala Physical Therapy."
Within each provider section, add dividers for office notes, imaging, surgery reports, therapy notes, medication records, and billing. Then place each group in chronological order, with the earliest record first.
For digital files, set up one main case folder. Inside that folder, create numbered subfolders for each provider so they stay in the same order every time you open them. Then, inside each provider folder, add subfolders by document type.
Use this file naming pattern for every record: YYYY-MM-DD – Provider – Document Type.pdf
For example:
2023-01-15 – Ocala Orthopedic Clinic – Office Note – Right Knee.pdf2023-02-03 – Marion Imaging Center – MRI Report – Lumbar Spine.pdf2023-02-10 – Ocala Regional Medical Center – Surgery Report – Knee Arthroscopy.pdf
Putting the four-digit year first keeps files in chronological order when you sort by name. Rename each file as soon as you get it, before saving it. That small habit saves a lot of cleanup later.
Build a treatment timeline from first care to latest visit
After your records are sorted, build a treatment timeline. Think of it as a running table that lists every injury-related visit in date order, from first care through your latest appointment.
Include:
- The date (MM/DD/YYYY)
- The provider
- The type of visit
- The main diagnosis or complaint
- Key tests or imaging
- Any notable findings or next steps
Use this format:
| Date | Provider | Visit Type | Diagnosis / Finding | Key Action |
|---|---|---|---|---|
| 01/03/2023 | Ocala Regional Medical Center – ER | Emergency visit | Motor vehicle collision, neck and low back pain, soft tissue injury | X-rays ordered; muscle relaxer prescribed |
| 01/10/2023 | Dr. Jane Doe | Office visit | Persistent low back pain | Ordered MRI; work restriction: no lifting >20 lbs. |
| 01/20/2023 | Marion Imaging Center | MRI | L4-L5 disc herniation | Referred to orthopedics |
| 02/05/2023 | Ocala Orthopedic Clinic | Office visit | Lumbar disc herniation confirmed | Physical therapy ordered; anti-inflammatory prescribed |
| 02/10/2023 | Ocala Physical Therapy | Therapy session #1 | Initial evaluation; limited range of motion; pain 7/10 | Home exercise program started |
A timeline like this helps you see the full treatment story at a glance. It also makes missing visits much easier to spot. And when your records are already lined up this way, the next step – choosing a storage system – goes much faster.
Step 3: Choose a secure storage system and keep it updated
Now that your records are sorted and your timeline is done, put everything in one secure system that’s easy to check and easy to share when your attorney asks for it.
Paper, digital, and hybrid storage: a side-by-side comparison
Each option comes with trade-offs. Here’s the side-by-side view:
| Storage Type | Key Advantages | Main Limitations | Best Use Cases |
|---|---|---|---|
| Paper | Tangible; originals are readily available | Vulnerable to loss, fire, or water damage; slower to search; harder to share quickly | People who do not use computers often; short, straightforward treatment periods |
| Digital | Fast searching and sorting; easy sharing; efficient backup options | Requires devices; security risks if not properly protected | Clients comfortable with technology; complex cases with frequent updates |
| Hybrid | Keeps originals and backups in separate formats | Requires effort in both formats; needs consistent organization in two places | Most personal injury cases involving ongoing treatment and multiple providers |
Pick one system and stick with it every time new records come in. That consistency matters more than people think. If you file documents one way on Monday and another way on Friday, things get messy fast.
For most injury claims, a hybrid system is usually the best fit. Keep paper originals in a locked file box or cabinet. Then store scanned copies in a secure digital backup. Use the same folder structure for your scans that you use for your paper files. That way, you’re not hunting through two different systems that speak two different languages.
Mark key originals "Original – Do Not Write On" and write notes only on copies. For digital files, follow the 3-2-1 rule: keep at least 3 copies of your claim file, on 2 different types of media, with 1 copy stored off-site. Turn on two-factor authentication, and don’t use shared or public devices.
File new records within 24–48 hours and review the full claim file once a week.
Track missing records and new additions
Next, track what’s missing so you can follow up fast. A one-page index works well here. Create a table with one row for each provider and columns for "Requested", "Received", "Missing," and "Last Updated."
Each time a new treatment record arrives, or each time you send a follow-up request, update that row. It gives you a clean paper trail of what you did and when you did it. That can help if an insurer later questions whether your claim file is complete.
A complete index also makes gaps easier to spot before settlement talks or deposition.
Conclusion: Keep the file clear, complete, and ready for review
Before you send your file to an attorney or insurer, make sure it’s complete, organized, and up to date. Keep every injury-related document in one place, including bills, EOBs, mileage logs, and receipts.
Once you have everything together, sort the file by provider and document type. Then put each folder in strict date order. That way, anyone reviewing it can follow your treatment from the accident through your most recent visit without having to piece things together.
Use one master timeline to show the full sequence of care. It makes the file much easier to review and helps connect each appointment, test, and charge to the same story.
Missing records can create gaps that insurers may use to challenge the severity of your injuries or argue about causation.
Update the file after each appointment, and use the index you built in Step 3 to track anything that’s still missing.
If your file feels incomplete or tough to sort, Ocala Injury Law offers free consultations and can help identify which records matter most.
FAQs
What if some medical records are missing?
If some medical records are missing, deal with that right away. A strong injury claim depends on complete paperwork, so keep asking for copies after each medical visit and add them to your file as you go.
If you still can’t get key records, a personal injury attorney can step in and use formal legal steps to get the evidence you need. Ocala Injury Law can help you make sure your documentation is complete.
Should I keep both paper and digital copies?
Yes – keep both.
Medical records matter a lot in personal injury claims, so ask for copies after every medical visit.
Keep paper records in a safe, organized file. Also save digital copies as scanned PDFs or clear photos so they’re easy to find and share with your attorney.
That way, your documentation stays complete and accurate.
How detailed should my treatment timeline be?
Keep your treatment timeline as detailed and complete as you can. Build it in order, from the first ER visit to every follow-up appointment after that. Include emergency care, later treatment, prescribed medications, recommended therapy, and how your injuries changed over time in medical reports and photos.
Clear, accurate records help show the link between the incident and your condition. That makes it easier to measure your limits, track your recovery, and understand what medical care you may need later.